Xenografts have become an essential tool in biomedical research, offering insight into disease mechanisms, therapeutic testing, and translational research. From the historical breakthroughs of early transplantation attempts to modern xenograft applications in cancer research, these models have facilitated a deeper understanding of pathophysiology and have enabled preclinical testing of novel therapeutics. This review provides a comprehensive examination of the scientific applications of xenografts, exploring their use across various fields of research, including immunology, oncology, and pharmacology, with a particular focus on the advancements in cancer xenograft models. The concept of grafting dates back to the 19th century, with Samuel Bigger’s landmark allograft on a gazelle in 1837, marking one of the earliest recorded transplant procedures (Bigger, 1837). This early experiment aimed to restore transparency to the animal’s cornea, illustrating the potential of transplantation in restoring function to damaged organs. Nearly seven decades later, Eduard Zirm achieved the first successful human corneal transplant in 1906, setting the stage for advancements in grafting techniques (Nature Biotechnology, 2000). These historical milestones underscore the continuous evolution of transplant methodologies, which have expanded significantly to include xenograft models for research purposes.
Understanding the immunological responses to xenografts has been pivotal for improving graft survival and therapeutic efficacy. Holan and Krulova (2013) highlighted the dichotomy between pro-inflammatory “killer” macrophages (M1) and anti-inflammatory “healer” macrophages (M2), both of which play distinct roles in transplant rejection and healing, respectively. During transplant rejection, M1 macrophages are activated by Th1 or Th17 cytokines, leading to the production of nitric oxide (NO)—a cytotoxic molecule involved in the rejection process. Conversely, M2 macrophages are activated by Th2 cytokines, promoting tissue repair and graft acceptance. This balance is regulated by the nitric oxide synthase (NOS) to arginase ratio, with both enzymes competing for the same substrate, L-arginine. Increased NO production is indicative of allograft rejection, whereas xenograft rejection and allograft healing are characterized by higher arginase levels, correlating with reduced NO production. This complex interplay between immune cell types and cytokines underscores the challenges and potential strategies for modulating immune responses in xenografts to improve outcomes.
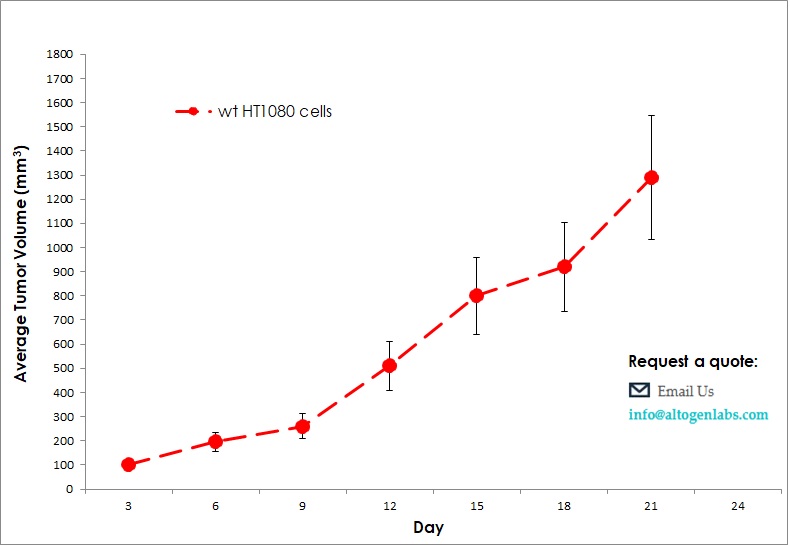
Xenograft Models in Cancer Research
Cancer research has greatly benefited from xenograft models, especially in evaluating drug efficacy and understanding tumor biology in vivo. Jardim-Perasse et al. (2014) conducted a study on breast cancer xenografts, observing tumor reduction following daily melatonin injections. Over a 21-day period, treated mice exhibited slower tumor growth compared to control mice, indicating melatonin’s potential as an adjuvant in cancer therapy. Similarly, Lu et al. (2013) advanced the use of xenograft models by demonstrating the efficacy of rottlerin, a polyphenolic ketone, in reducing tumor growth. Their study involved a six-week administration of 0.012% rottlerin in the diet of murine xenograft models, with subsequent high-performance liquid chromatography with diode-array detection (HPLC-DAD) to quantify rottlerin levels in plasma and tumor tissues. This methodology confirmed efficient cellular absorption of the compound, supporting its potential application in cancer treatment. Leonard et al. (2014) focused on xenograft models of childhood acute myeloid leukemia (AML) to evaluate the cytotoxic effect of cytarabine, a chemotherapeutic agent. Their findings revealed that when combined with decitabine, cytarabine’s efficacy in reducing tumor burden was significantly enhanced, as indicated by a decrease in the CD45+/CD33+ bone marrow cell population. This combinatory approach underscores the importance of xenografts in testing combination therapies, particularly in aggressive cancers like AML, where synergistic drug effects can lead to improved patient outcomes.
Xenograft models are also invaluable for pharmacokinetic and pharmacodynamic studies, which are crucial for determining drug absorption, distribution, metabolism, and excretion (ADME). For instance, Lu et al. (2013) utilized a reverse-phase HPLC-DAD method to quantify rottlerin levels in both plasma and tumor tissues, illustrating a reliable approach to measure compound bioavailability in xenograft models. Such studies provide essential insights into the pharmacokinetics of potential therapeutics, allowing researchers to optimize drug dosing and delivery mechanisms before progressing to clinical trials. Additionally, xenograft models facilitate pharmacodynamic assessments by allowing real-time monitoring of drug effects on tumor growth and survival, yielding valuable data that can predict clinical outcomes.
While xenograft models have advanced our understanding of disease mechanisms and therapeutic efficacy, they also come with limitations, such as the incomplete recapitulation of the human tumor microenvironment and potential immunological differences between species. Efforts to humanize xenograft models, such as using immunodeficient mice that allow for human immune cell engraftment, represent a promising solution to these challenges (Berglund et al., 2012). Future research should focus on refining xenograft models to better mimic human pathophysiology, enabling more accurate predictions of therapeutic outcomes in clinical settings. Xenograft models have proven indispensable in translational research, bridging the gap between in vitro studies and clinical trials. From elucidating immune responses in transplantation to assessing novel cancer therapeutics, xenografts offer a versatile platform for scientific exploration. Continued advancements in xenograft technology and model refinement will enhance their utility, fostering more precise and predictive preclinical research.
Commercially available validated xenograft models available from Altogen Labs:
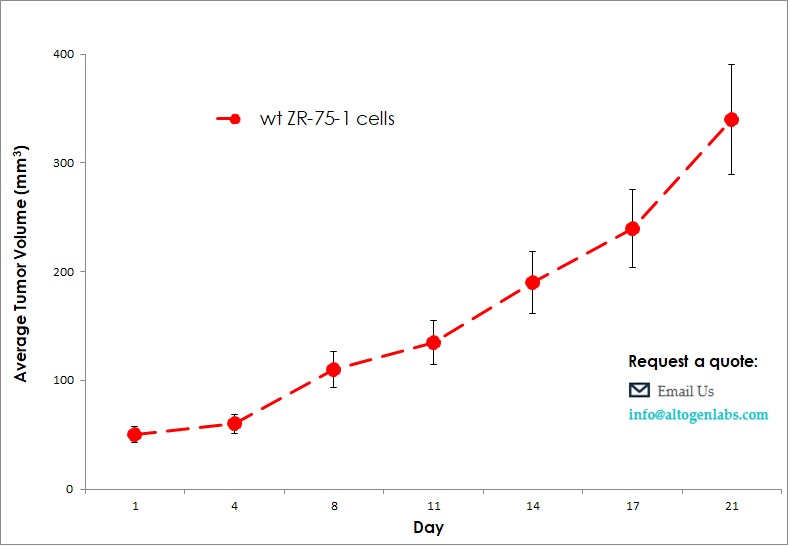
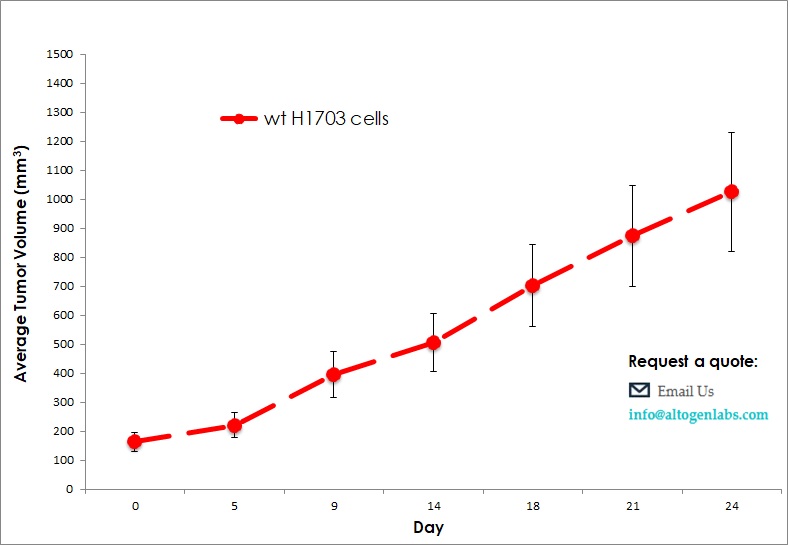
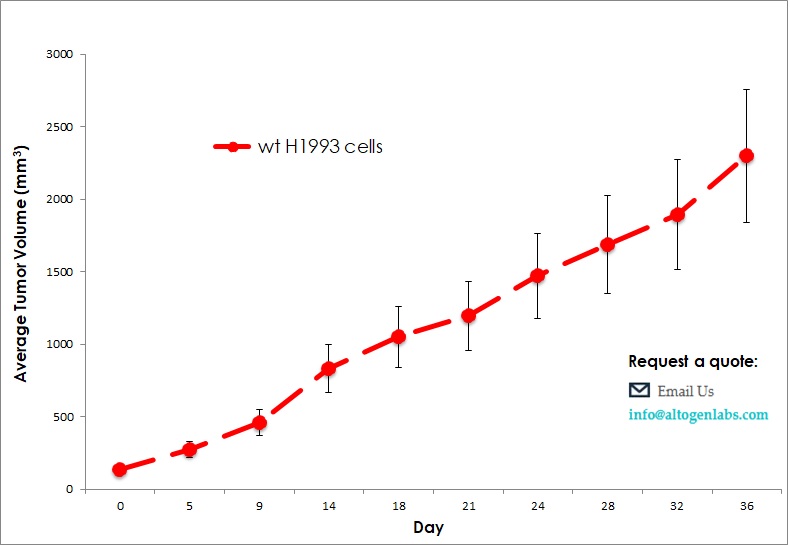
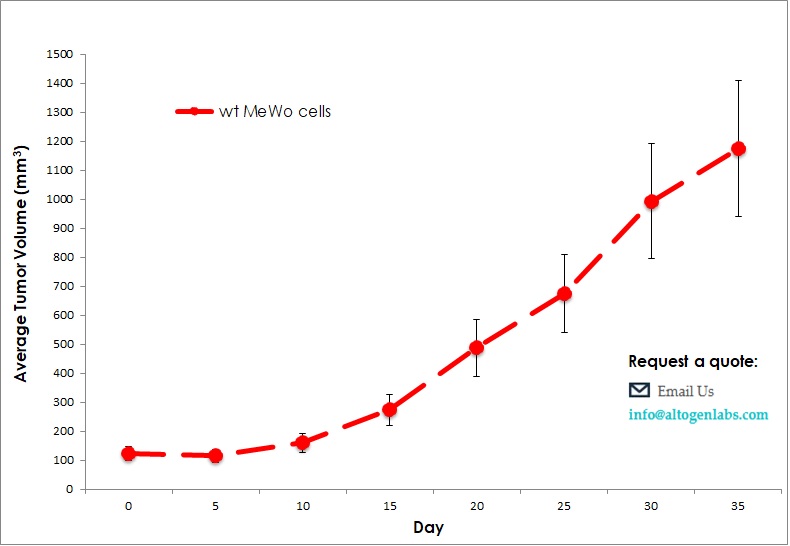
Benefits and Applications of Xenograft Models in Cancer Research
Xenograft models are widely used in preclinical research due to their ability to provide biologically relevant, reproducible, and cost-effective platforms for testing therapeutic candidates. In our in vivo xenograft CRO services, we employ these models to deliver accurate results efficiently, addressing the demands of fast-paced cancer research. Xenografts offer distinct advantages, including straightforward handling, scalability, and cost-effectiveness. However, limitations exist, as these models may not fully capture the genetic diversity and histopathology of human tumors, potentially affecting the predictive accuracy for specific therapies.
Advantages of Human Tumor Xenografts
Human tumor xenografts have become integral to cancer research, offering insights that outweigh their limitations. Key advantages include:
- Genomic and Epigenetic Complexity: Xenografts maintain a range of genetic and epigenetic abnormalities similar to those observed in the human population, enhancing their relevance for studying cancer heterogeneity and therapeutic responses (Hidalgo et al., 2014).
- Personalized Molecular Therapies: These models can support the development of personalized treatments by testing specific drug responses on individual patient-derived tumors, paving the way for precision oncology (Gao et al., 2015).
- Multiple Treatment Trials on a Single Tumor: Xenografts enable multiple therapies to be tested sequentially or concurrently on a single tumor biopsy, which allows for comparative drug efficacy studies and combination therapy assessments.
- Incorporation of Human Stroma: By integrating human stromal components into the xenograft, researchers can simulate the tumor microenvironment more accurately, facilitating studies on tumor-stroma interactions and immune modulation.
Heterotopic Tumor Xenografts: Characteristics and Applications
Heterotopic xenograft models, where tumors are implanted subcutaneously, have been a mainstay in preclinical research for over 30 years. These models are especially valued for their rapid generation and ease of use, offering several distinct benefits:
- Quick Results and Cost Efficiency: The subcutaneous location allows for easier tumor monitoring and faster tumor growth, providing timely data at a relatively low cost (Bibby, 2004).
- Reproducibility: Heterotopic models are straightforward to establish and are highly reproducible, making them suitable for screening large numbers of compounds.
- Adequate Preclinical Testing Platform: These models are commonly used to assess the preliminary efficacy of anti-cancer agents, offering visual confirmation of tumor presence and response to treatments over time.
One example of a successful heterotopic model is the PANC-1 pancreatic cancer cell line, frequently used in hind leg xenografts for preclinical testing. In a recent study, PANC-1 xenografts were employed to evaluate the efficacy of an engineered vaccinia virus as a potential therapeutic for pancreatic carcinoma (Mahalingam et al., 2015). Similarly, luciferase-expressing PANC-1 cells are used in imaging studies, enabling real-time assessment of tumor growth and response to ionizing radiation.
How to order PDX xenograft animal testing service? – please visit our Patient Testing webpage
Orthotopic Tumor Xenografts: Advantages in Site-Specific Cancer Research
Orthotopic xenograft models, where tumor cells are implanted into the organ of origin, offer additional advantages by closely mimicking the natural tumor environment:
- Tumor-Host Interactions at Relevant Sites: Orthotopic models provide insights into the interactions between the tumor and its microenvironment, essential for understanding tumor biology and the metastatic process (Khanna & Hunter, 2005).
- Metastasis Observation: Unlike heterotopic models, orthotopic models allow researchers to observe disease-relevant metastasis patterns, facilitating studies on metastatic progression and drug efficacy in controlling metastatic spread.
- Site-Specific Therapeutic Effects: These models enable evaluation of therapeutic effects at specific tumor sites, aiding in the development of treatments tailored to particular tumor locations and improving translational relevance.
For example, NCI-H292 cells, a model for non-small cell lung cancer (NSCLC), have been implanted orthotopically to study the efficacy of monoclonal antibody treatments. In these studies, the combination of NCI-H292 xenografts with monoclonal antibodies, chemotherapy, and radiation therapies has been shown to enhance therapeutic outcomes (Giaccone et al., 2018).
Challenges and Considerations in Using Human Tumor Xenografts
While xenografts provide valuable platforms, their generation can be labor-intensive, costly, and time-consuming. The process involves rigorous preparation, including anesthetizing the animal, ensuring sterility, and precise implantation procedures. However, the clinical relevance gained by using human tumor xenografts justifies these efforts, as they offer a unique approach for examining disease pathophysiology and therapeutic response.
Standard Protocols for Pancreatic Cancer Xenografts
Preparation of Pancreatic Cancer Cell Lines for Xenograft Studies
Cell Detachment and Harvesting: Initiate by rinsing the cell culture plate with sterile PBS, adding 1X trypsin-EDTA (0.05%), and incubating at 37°C. Lightly tapping the plate may facilitate cell detachment.
Collection and Washing: Once detached, collect the cells in a centrifuge tube, wash with PBS, and re-suspend in culture media.
Cell Quantification and Inoculum Preparation: Adjust cell concentration to 1 million cells/ml. Aliquot cells as required and prepare a final cell suspension with Hank’s balanced salt solution (HBSS) containing 1% matrigel.
- Rinse cell culture plate twice with sterile PBS.
- Add 2 ml of 1X trypsin-EDTA (0.05%) to plate or enough to just cover surface area of cells. Place back in 37°C incubator.
- Three minutes after the addition of trypsin, examine cell adherence to surface of cell culture plate or flask. Lightly tap the cell culture plate or flask if majority of cells have been released. If many cells remain adherent, place back in 37°C incubator for an additional 3 minutes, lightly tapping cell container as needed.
- Once most cells (>98%) have detached from the plate, add sterile culture media 5:1 to volume of trypsin added to culture flask. Gently pass cell suspension through 10ml pipette 5 times to reduce cell clumping and to remove remaining adherent cells.
- Collect cells into 15ml or 50ml centrifuge tube, depending on the volume of cell solution collected. Proceed to centrifuge cells at 1200rpm for 5 minutes, resulting in the formation of a cell pellet. Wash cell pellet once with sterile PBS and re-suspend pellet in sterile culture media.
- Quantitate cells using a hemacytometer or cell counter. Adjust cell concentration to 1 million cells/ml with sterile culture media.
- Divide into aliquots of 1 × 10⁶ cells (10 ml) and again centrifuge at 1200rpm for 5 minutes. Thoroughly re-suspend pellet in 20mL of sterile Hank’s balanced salt solution (HBSS) containing 1% serum-free matrigel by volume (4°C), bringing cell concentration to 500,000cells per 100ul (final cell inoculum).
- The concentration of cells in the prepared cell solution may be altered depending on the desired cell inoculum, site of injection, and specific experimental objectives. Regardless, due to technical considerations, one should prepare at least twice the volume of cell solution required for experiments.
- Keeping cell solution on ice, aspirate into an open 1.0 ml syringe and cap with a 25 gauge needle.
- Proceed to heterotopic or orthotopic cell injection. It is important to maintain 1% matrigel-cell solution on ice at all times to prevent premature gel formation.
This method has been used extensively for preparing PANC-1 cells, which are then injected heterotopically or orthotopically for pancreatic cancer studies.
Orthotopic Implantation Procedure
For orthotopic pancreatic cancer implantation:
Animal Preparation: Anesthetize recipient mice and prepare the left abdominal area.
Cell Injection: Externalize the pancreas and inject the prepared cell suspension into the pancreatic tail, allowing for matrigel solidification.
Post-Injection Monitoring: Close incisions with sutures, apply antibiotic ointment, and monitor animals for recovery.
- Prepare pancreatic cancer cell solution (from cell lines or tumor) to a concentration of 500,000 cells per 100µl in Hank’s balanced salt solution containing 1% matrigel. Leave on ice with occasional vortex agitation.
- Anesthetize recipient nude or NOD/SCID mice.
- Shave left abdominal/flank region of mice with clippers and place mice on their right side. Paint left sides of mice from the base of the neck to tail with a 70% ethanol solution.
- Proceed with animal surgery and cell implantation.
- Identify silhouette of spleen through intact, shaved skin. Pick up skin with forceps and make a 1.2 cm incision with sterile micro-scissors slightly medial to splenic silhouette.
- Grasp underlying muscle with forceps and lift to enter the abdominal cavity without injury to underlying organs. Extend muscle incision with micro-scissors to 0.75cm.
- Using a pair of blunt-nose forceps, gently grasp the tip of the pancreatic tail and externalize pancreas/spleen in a lateral fashion, exposing the entire pancreatic body and spleen.
- Remove syringe containing cell suspension (cell line or xenograft-derived) from ice and vortex agitate to disrupt cell clumps/cluster.
- While gently retracting pancreas laterally, insert needle into the tail of pancreas and pass into the pancreatic head region. Slowly inject 100µl of cell solution while withdrawing needle to mid-body of pancreas. Remove needle from pancreas and observe needle tract for leak/bleeding.
- Leave pancreas externalized and untouched for 2 minutes for matrigel to solidify while inspecting pancreas for vascular injury and/or leakage of cell solution. Gently internalize pancreas/spleen with blunt forceps and close abdominal muscle layer with interrupted stitches (3-0 silk suture). Close overlying skin with a second set of interrupted stitches (3-0 silk suture) and apply antibiotic ointment.
- Recover animals from anesthetic.
Heterotopic Implantation
For heterotopic implantation:
Injection Site Preparation: Shave the desired site, if necessary, and apply 70% ethanol for sterility.
Subcutaneous Injection: Inject the cell suspension subcutaneously, monitoring for leakage.
Post-Injection Observation: Ensure proper recovery from anesthesia and monitor tumor formation.
- Anesthetize immunocompromised nude or NOD/SCID mice.
- If required, shave desired injection site and place mouse on its contralateral side. Depending on the location of cell implantation, paint corresponding side of mouse with 70% ethanol solution.
- Gently agitate syringe containing cell suspension to disrupt cell clumps/clusters.
- Identify desired location of cell implantation. While gently grasping skin with forceps for counter-traction, penetrate skin with the needle tip approximately a needle’s length from desired injection site. Direct needle to desired implantation site while passing the needle parallel to animal body.
- Once the needle is confirmed to be in the subcutaneous space, slowly inject 150 µl.
- Withdraw needle slowly from tract and monitor for 2 minutes for gross leakage.
- Recover mice from the effects of anesthetic.
The use of xenograft models has become indispensable in cancer research, providing a reproducible, cost-effective, and clinically relevant approach for evaluating therapeutic responses. Whether using heterotopic or orthotopic models, human tumor xenografts facilitate insights into tumor behavior, drug efficacy, and patient-specific treatment potentials, driving advancements in personalized oncology.
Contact us and request a contract research study quote at https://altogenlabs.com/request-quote/